Developer Guide
- Setting up, getting started
- Design
- Implementation
- Documentation, logging, testing, configuration, dev-ops
- Appendix: Requirements
- Appendix: Instructions for manual testing
- Planned enhancements
Setting up, getting started
Refer to the guide Setting up and getting started.
Design
.puml files used to create diagrams in this document docs/diagrams folder. Refer to the PlantUML Tutorial at se-edu/guides to learn how to create and edit diagrams.
Architecture
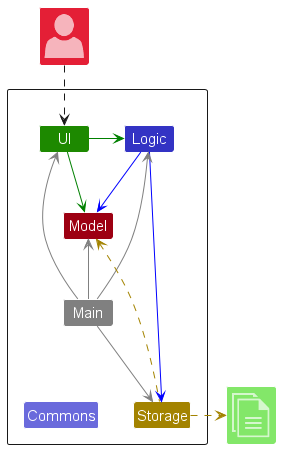
The Architecture Diagram given above explains the high-level design of the App.
Given below is a quick overview of main components and how they interact with each other.
Main components of the architecture
Main (consisting of classes Main and MainApp) is in charge of the app launch and shut down.
- At app launch, it initializes the other components in the correct sequence, and connects them up with each other.
- At shut down, it shuts down the other components and invokes cleanup methods where necessary.
The bulk of the app’s work is done by the following four components:
-
UI: The UI of the App. -
Logic: The command executor. -
Model: Holds the data of the App in memory. -
Storage: Reads data from, and writes data to, the hard disk.
Commons represents a collection of classes used by multiple other components.
How the architecture components interact with each other
The Sequence Diagram below shows how the components interact with each other for the scenario where the user issues the command delete S1234567X.
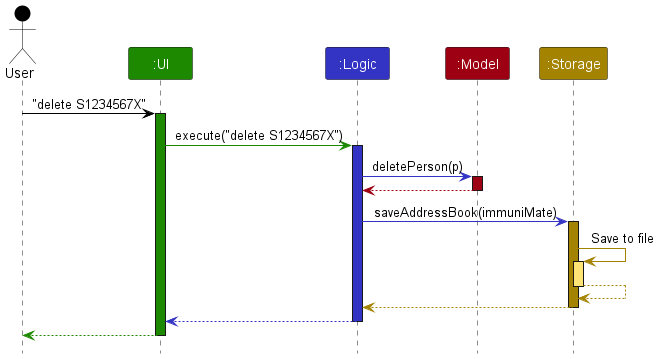
Each of the four main components (also shown in the diagram above),
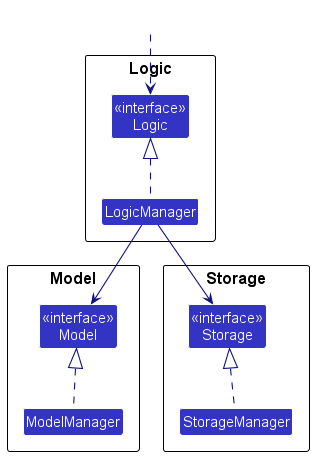
- defines its API in an
interfacewith the same name as the Component. - implements its functionality using a concrete
{Component Name}Managerclass (which follows the corresponding APIinterfacementioned in the previous point.
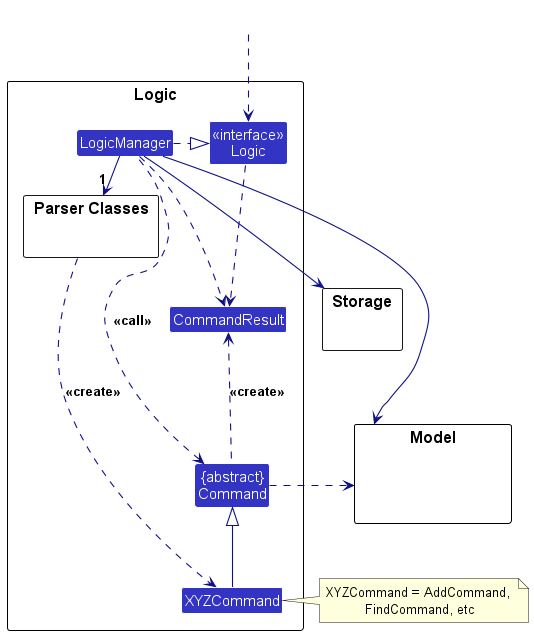
For example, the Logic component defines its API in the Logic.java interface and implements its functionality using the LogicManager.java class which follows the Logic interface. Other components interact with a given component through its interface rather than the concrete class (reason: to prevent outside component’s being coupled to the implementation of a component), as illustrated in the (partial) class diagram below.
The sections below give more details of each component.
UI component
The API of this component is specified in Ui.java
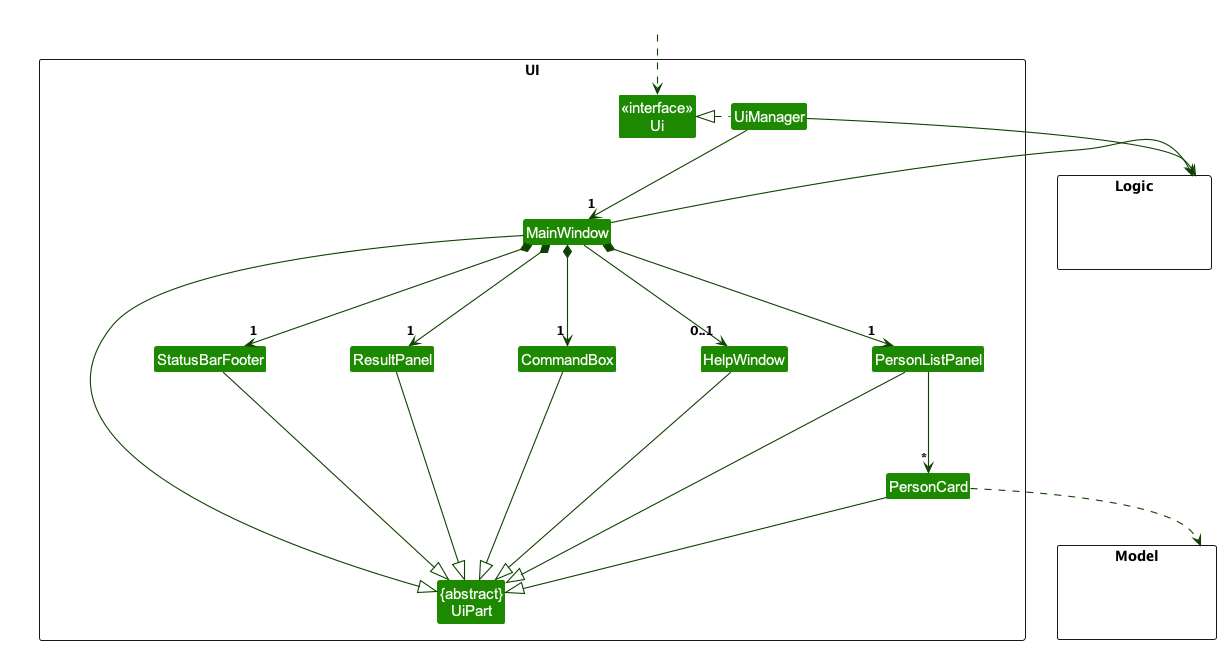
The UI consists of a MainWindow that is made up of parts e.g.CommandBox, ResultDisplay, PersonListPanel, StatusBarFooter etc. All these, including the MainWindow, inherit from the abstract UiPart class which captures the commonalities between classes that represent parts of the visible GUI.
The UI component uses the JavaFx UI framework. The layout of these UI parts are defined in matching .fxml files that are in the src/main/resources/view folder. For example, the layout of the MainWindow is specified in MainWindow.fxml
The UI component,
- executes user commands using the
Logiccomponent. - listens for changes to
Modeldata so that the UI can be updated with the modified data. - keeps a reference to the
Logiccomponent, because theUIrelies on theLogicto execute commands. - depends on some classes in the
Modelcomponent, as it displaysPersonobject residing in theModel.
Logic component
API : Logic.java
Here’s a (partial) class diagram of the Logic component:
The sequence diagram below illustrates the interactions within the Logic component, taking execute("delete S1234567X") API call as an example.
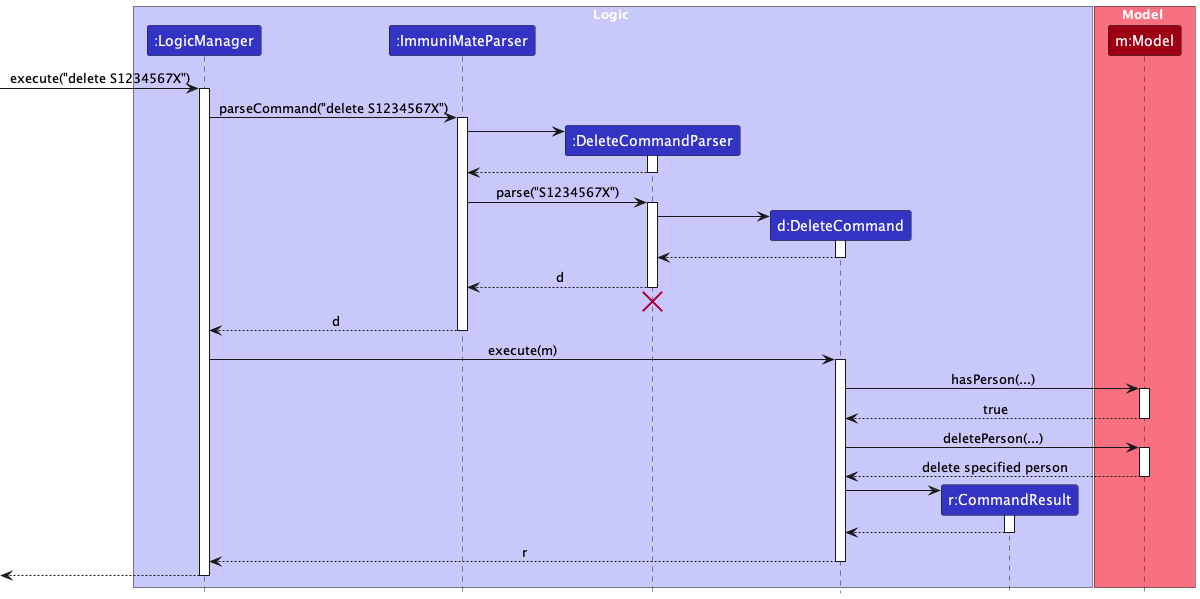
DeleteCommandParser should end at the destroy marker (X) but due to a limitation of PlantUML, the lifeline continues till the end of diagram.
How the Logic component works:
- When
Logicis called upon to execute a command, it is passed to anImmuniMateParserobject which in turn creates a parser that matches the command (e.g.,DeleteCommandParser) and uses it to parse the command. - This results in a
Commandobject (more precisely, an object of one of its subclasses e.g.,DeleteCommand) which is executed by theLogicManager. - The command can communicate with the
Modelwhen it is executed (e.g. to delete a person).
Note that although this is shown as a single step in the diagram above (for simplicity), in the code it can take several interactions (between the command object and theModel) to achieve. - The result of the command execution is encapsulated as a
CommandResultobject which is returned back fromLogic.
Here are the other classes in Logic (omitted from the class diagram above) that are used for parsing a user command:
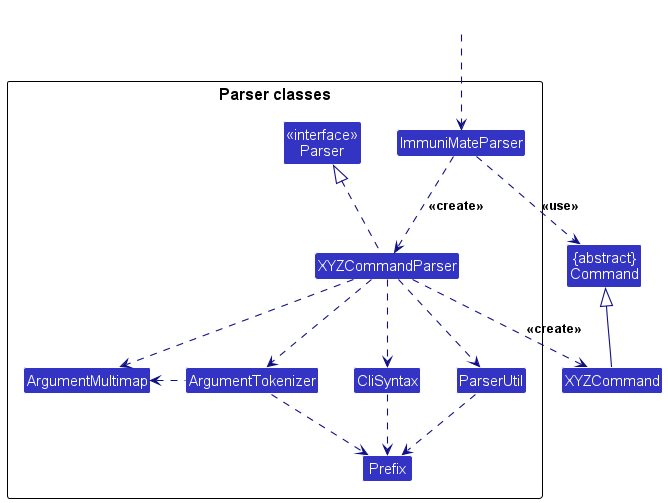
How the parsing works:
- When called upon to parse a user command, the
ImmuniMateParserclass creates anXYZCommandParser(XYZis a placeholder for the specific command name e.g.,CreateCommandParser) which uses the other classes shown above to parse the user command and create aXYZCommandobject (e.g.,CreateCommand) which theImmuniMateParserreturns back as aCommandobject. - All
XYZCommandParserclasses (e.g.,CreateCommandParser,DeleteCommandParser, …) inherit from theParserinterface so that they can be treated similarly where possible e.g, during testing.
Model component
API : Model.java
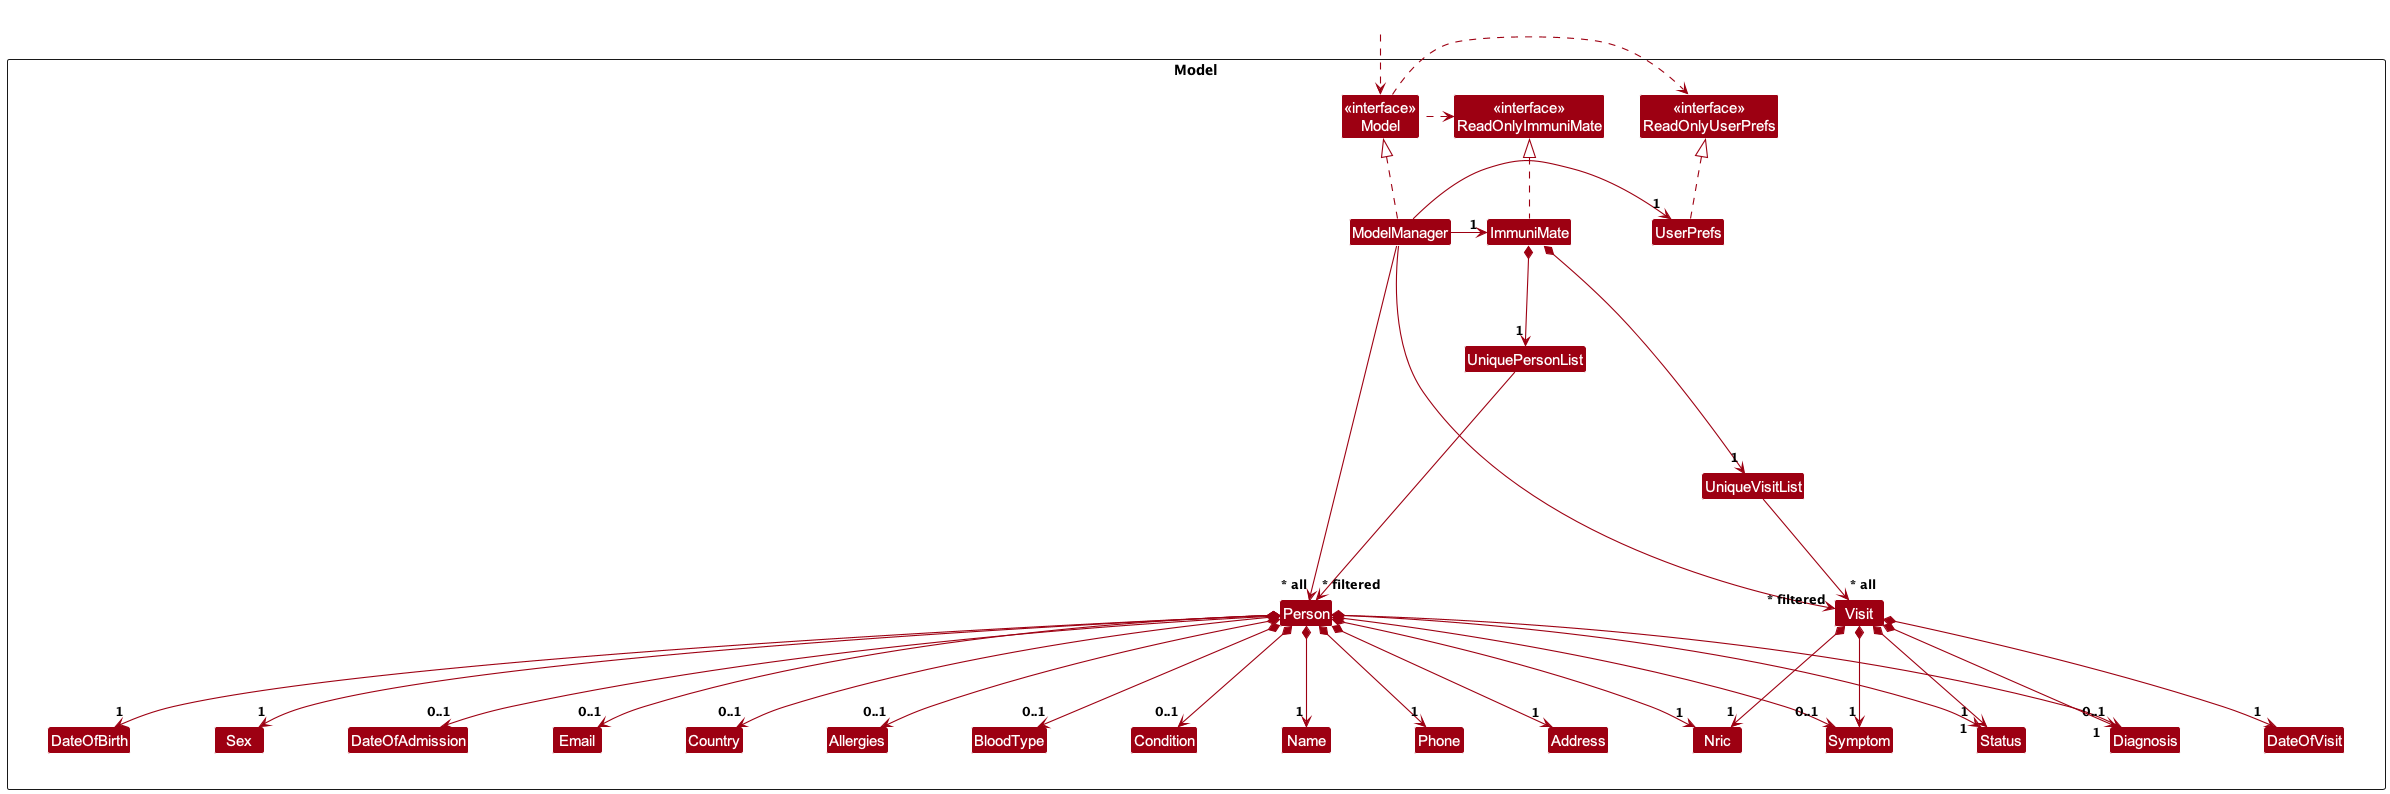
The Model component,
- stores the patient data i.e., all
Personobjects (which are contained in aUniquePersonListobject). - stores the currently ‘selected’
Personobjects (e.g., results of a search query) as a separate filtered list which is exposed to outsiders as an unmodifiableObservableList<Person>that can be ‘observed’ e.g. the UI can be bound to this list so that the UI automatically updates when the data in the list change. - stores a
UserPrefobject that represents the user’s preferences. This is exposed to the outside as aReadOnlyUserPrefobjects. - does not depend on any of the other three components (as the
Modelrepresents data entities of the domain, they should make sense on their own without depending on other components)
Storage component
API : Storage.java
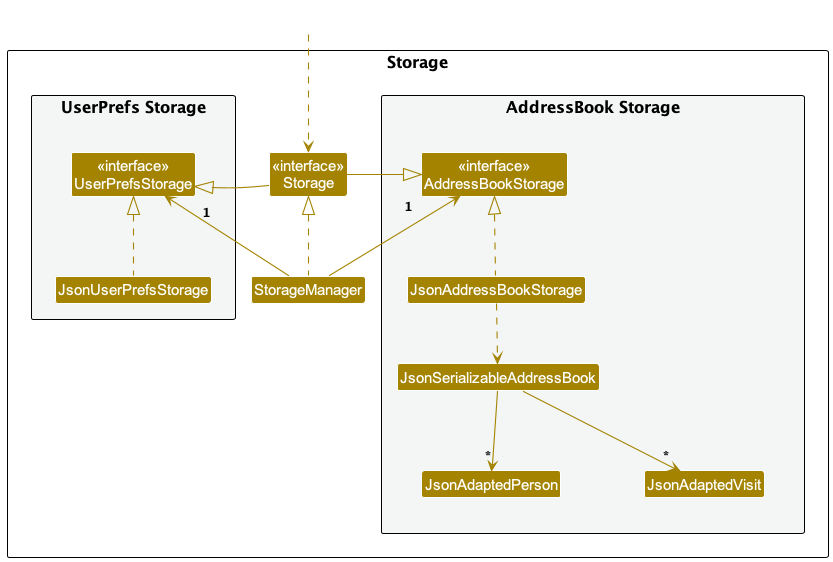
The Storage component,
- can save both address book data and user preference data in JSON format, and read them back into corresponding objects.
- inherits from both
AddressBookStorageandUserPrefStorage, which means it can be treated as either one (if only the functionality of only one is needed). - depends on some classes in the
Modelcomponent (because theStoragecomponent’s job is to save/retrieve objects that belong to theModel)
Common classes
Classes used by multiple components are in the seedu.address.commons package.
Implementation
This section describes some noteworthy details on how certain features are implemented.
List all patients
Implementation
The list feature allows users to view all patients in the system through the list command. This patient data is then displayed in the system for the user to have an overview of all patients.
The list command is facilitated by ListCommand which extends the Command classes, listing all instances in the Model.
-
ListCommand#executeis responsible for executing the command and listing all patients in the system. -
Model#updateFilteredPersonList()is called to make the UI display all patients in the system.
Step 1. ListCommand#execute is called by the LogicManager. The ListCommand calls model.updateFilteredPersonList() to update the filtered list of patients in the system.
Step 2. Model#updateFilteredPersonList(PREDICATE_SHOW_ALL_PERSONS) is called to update the filtered list such that it shows all patients in the system.
Step 3. The ListCommand returns the appropriate CommandResult to indicate the success of the operation.
Help
Implementation
The help feature allows users to view the link to User Guide. This command is facilitated by HelpCommand which extends the Command classes.
-
HelpCommand#executeis responsible for executing the command and listing the link to the User Guide.
Step 1. Parser interprets the user’s input and creates a new HelpCommand instance.
Step 2. HelpCommand#execute is called by the LogicManager. The HelpCommand returns the appropriate CommandResult, which signals the UI to display the help window .
Create new patient
Implementation
The create feature allows users to create a patient by providing input through a command with specific arguments. This patient data is then stored within the system for future reference.
The create command is facilitated by CreateCommand and CreateCommandParser. They extend the Command and Parser classes respectively, storing a new instance of Person in the UniquePersonList.
-
CreateCommandParser#parseis responsible for parsing the user input and creating a newCreateCommandinstance. -
CreateCommand#executeis responsible for executing the command and adding the new patient to the system. -
ImmuniMate#addPerson(Person)is called to add the patient to the internal list of patients. -
UniquePersonList#add(Person)is used to add the new patient to the system.
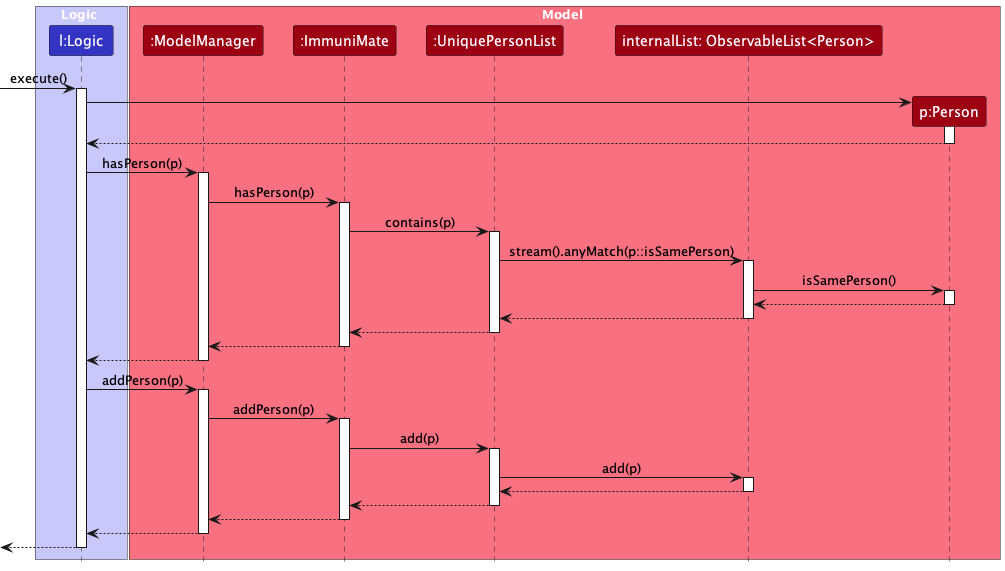
ModelManager#addPerson(Person) is called to add the patient to the system. It calls ImmuniMate.addPerson(Person) which calls UniquePersonList#add(Person) to add the patient to the internal list of patients.
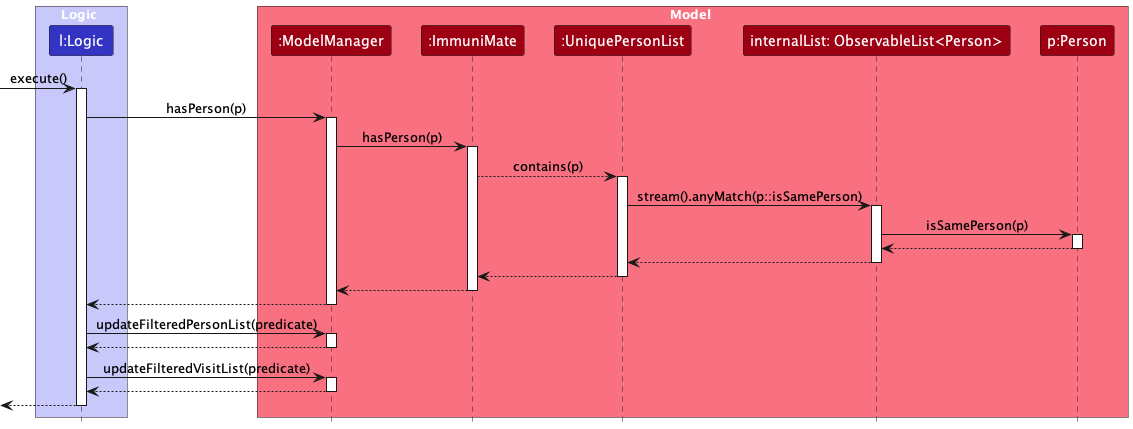
The command checks for duplicates in the system before adding the new patient.
-
Person#equals(Object)is overridden to check if two patients are duplicates. -
UniquePersonList#contains(Person)is used to check if the patient already exists in the system’s list of patients. -
ImmuniMate#hasPerson(Person)is used to check if the patient already exists in the system.ModelManager#hasPerson(Person)is called to check if the patient already exists in the system. It callsImmuniMate.hasPerson(Person)which callsUniquePersonList#contains(Person)to check if the patient already exists in the internal list of patients.
The creation of Person instance also rely on field classes, such as Name, Nric, Phone, Address, DateOfBirth, Sex, and Status. Optional field classes include Email, Country, DateOfAdmission, BloodType, Allergies, Conditions, Symptoms, and Diagnosis.
Step 1. CreateCommandParser interprets the user’s input, creates instances of fields which matches the input, and creates a new CreateCommand instance.
Step 2. The CreateCommand#execute is called by the LogicManager. The CreateCommand checks if the patient already exists in the system by calling model.hasPerson(person).
Step 3. If there is no duplicate, the patient is added to the system by calling model.addPerson(person).
Step 4: After the patient is added, the CreateCommand returns the appropriate CommandResult to indicate the success of the operation.
The following sequence diagram shows how a create operation goes through the Logic component:
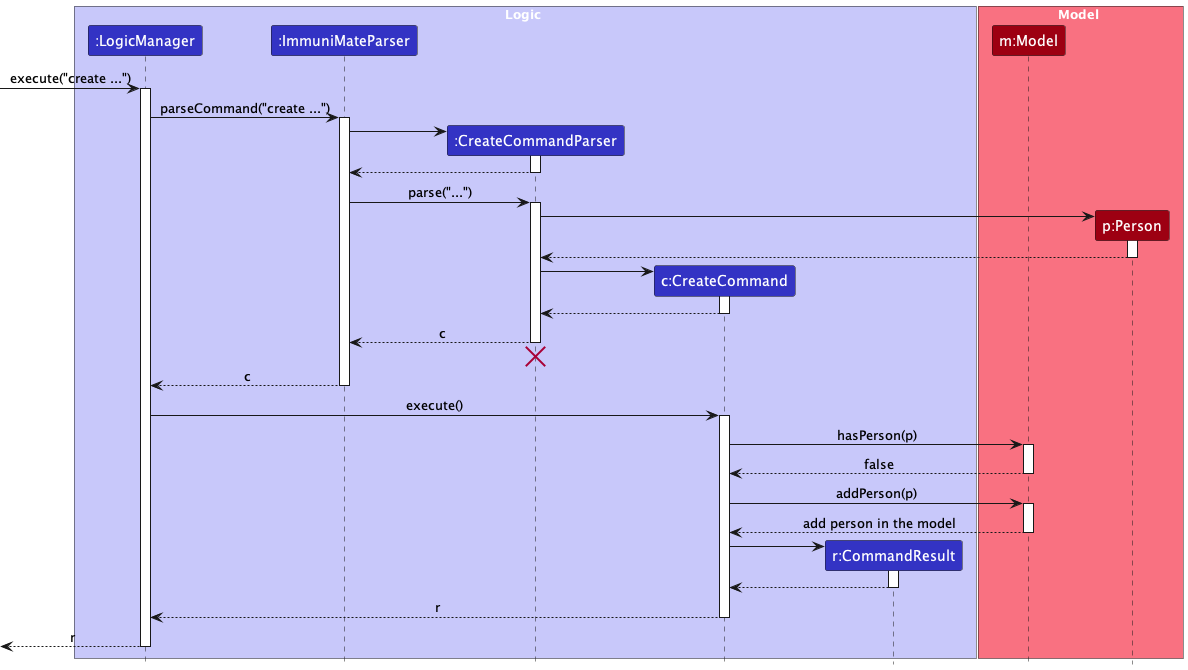 Similarly, the following sequence diagram shows how a create operation goes through the
 Model component:
Delete patient
Implementation
The delete feature allows users to delete a patient by providing NRIC through a command. This patient data is then removed from the system.
The delete command is facilitated by DeleteCommand and DeleteCommandParser. They extend the Command and Parser classes respectively, removing an instance of Person from the UniquePersonList.
-
DeleteCommandParser#parseis responsible for parsing the user input and creating a newDeleteCommandinstance. -
DeleteCommand#executeis responsible for executing the command and removing the patient from the system. -
ImmuniMate#removePerson(Person)is called to remove the patient from the internal list of patients. -
UniquePersonList#remove(Person)is used to remove the patient from the system.ModelManager#deletePerson(Person)is called to remove the patient from the system. It callsImmuniMate.removePerson(Person)which callsUniquePersonList#remove(Person)to remove the patient from the internal list of patients.DeleteCommandchecks if the patient exists in the system before removing the patient. -
ModelManager#hasPerson(Person)is called to check if the patient already exists in the system. It callsImmuniMate.hasPerson(Person)which callsUniquePersonList#contains(Person)to check if the patient already exists in the internal list of patients.
Step 1. DeleteCommandParser interprets the user’s input for NRIC, and creates a new DeleteCommand instance.
Step 2. The DeleteCommand#execute is called by the LogicManager. The DeleteCommand checks if the patient exists in the system by calling model.hasPerson(person).
Step 3. If the patient exists, the patient is removed from the system by calling model.deletePerson(person).
Step 4: After the patient is removed, the DeleteCommand returns the appropriate CommandResult to indicate the success of the operation.
The following sequence diagram shows how a delete operation goes through the Logic and Model component:
Delete patient information
Implementation
The deleteinfo command allows users to delete a patient’s particular field of information by providing NRIC and the field to be deleted through a command.
This deleteinfo command is facilitated by DeleteInfoCommand and DeleteInfoCommandParser. They extend the Command and Parser classes respectively, removing a particular field of information from the Person object.
-
DeleteInfoCommandParser#parseis responsible for parsing the user input and creating a newDeleteInfoCommandinstance. -
DeleteInfoCommand#executeis responsible for executing the command and removing the field of information from the patient. -
Model#getFilteredPersonList()is called to get the list of patients in the system. -
Observablelist<Persons>#filtered(Predicate)is called to obtainPersonobject of patient with specified NRIC. -
Observablelist<Persons>#get(int)is called to obtainPersonobject in the filtered list. -
Person#setFieldwhereFieldrefers to whichever field specified to be deleted, is responsible for removing the field of information from the patient.DeleteInfoCommandchecks if the patient exists in the system before removing the field of information. -
ModelManager#hasPerson(Person)is called to check if the patient already exists in the system. It callsImmuniMate.hasPerson(Person)which callsUniquePersonList#contains(Person)to check if the patient already exists in the internal list of patients.
Step 1. DeleteInfoCommandParser interprets the user’s input for NRIC and the fields to be deleted, and creates a new DeleteInfoCommand instance.
Step 2. The DeleteInfoCommand#execute is called by the LogicManager. The DeleteInfoCommand checks if the patient exists in the system by calling model.hasPerson(person).
Step 3. If the patient exists, the DeleteInfoCommand calls model.getFilteredPersonList().filtered().get() to get the specified patients in the system.
Step 4. DeleteInfoCommand#execute check which fields are to be deleted, and remove the field of information using Person#setField(null). Where Field is the field to be deleted.
Step 5: After the field of information is removed, the DeleteInfoCommand returns the appropriate CommandResult to indicate the success of the operation.
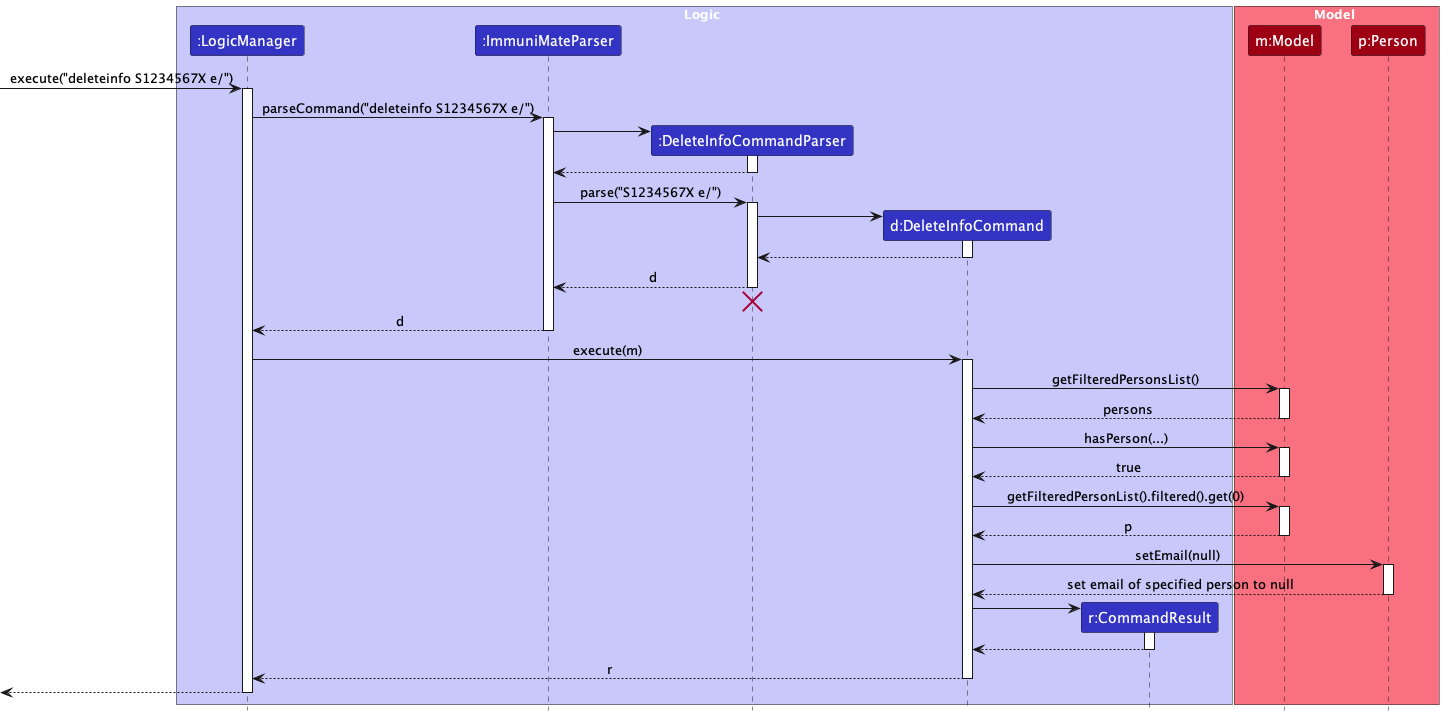
The following sequence diagram shows how a deleteinfo operation goes through the Logic component:
The sequence diagram for how the deleteinfo operation goes through the Model Component is as the following:

Read a patient’s information
Implementation
The read feature allows users to read a patient profile by providing NRIC through a command. This patient data is then displayed.
The read command is facilitated by ReadCommand and ReadCommandParser. They extend the Command and Parser classes respectively, displaying patient profile from an instance of Person from the UniquePersonList.
-
ReadCommandParser#parseis responsible for parsing the user input and creating a newReadCommandinstance. -
ReadCommand#executeis responsible for executing the command and displaying the patient profile from the system.ReadCommandchecks if the patient exists in the system before displaying patient profile. -
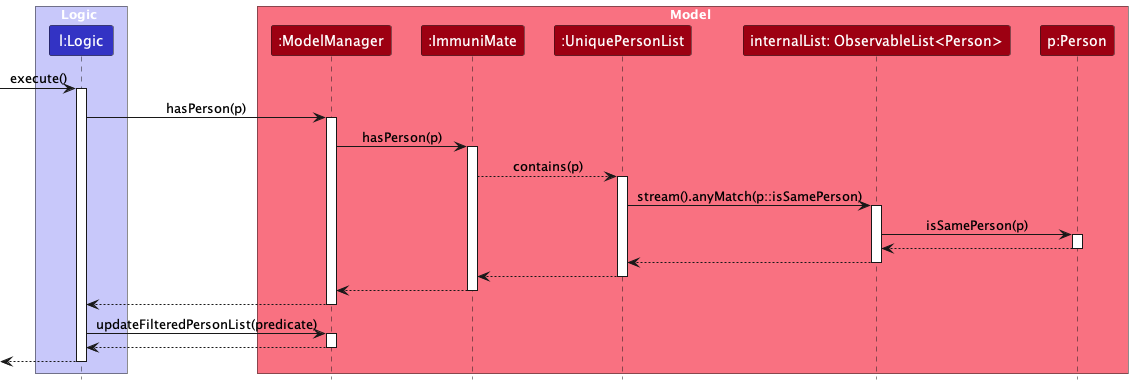
ModelManager#hasPerson(Person)is called to check if the patient exists in the system. It callsImmuniMate.hasPerson(Person)which callsUniquePersonList#contains(Person)to check if the patient already exists in the internal list of patients. -
Model#updateFilteredPersonList(Predicate)and is called to update the list to be of patient with specified NRIC in the system. -
Model#getFilteredPersonList()is called to get the list of patient with specified NRIC in the system. -
Observablelist<Persons>#get(int)is called to obtainPersonobject of patient with speicified NRIC.
Step 1. ReadCommandParser interprets the user’s input for NRIC, and creates a new ReadCommand instance.
Step 2. The ReadCommand#execute is called by the LogicManager. The ReadCommand checks if the patient exists in the system by calling model.hasPerson(person).
Step 3. If the patient exists, the patient is obtained from the system by calling model.updateFilteredPersonList(person), followed by calling model.getFilteredPersonList() and Observablelist<Persons>#get(int).
Step 4: After the patient is obtained, the ReadCommand formats the patient profile by calling Messages.format(person) and returns the appropriate CommandResult to indicate the success of the operation.
The following sequence diagram shows how a read operation goes through the Logic component:
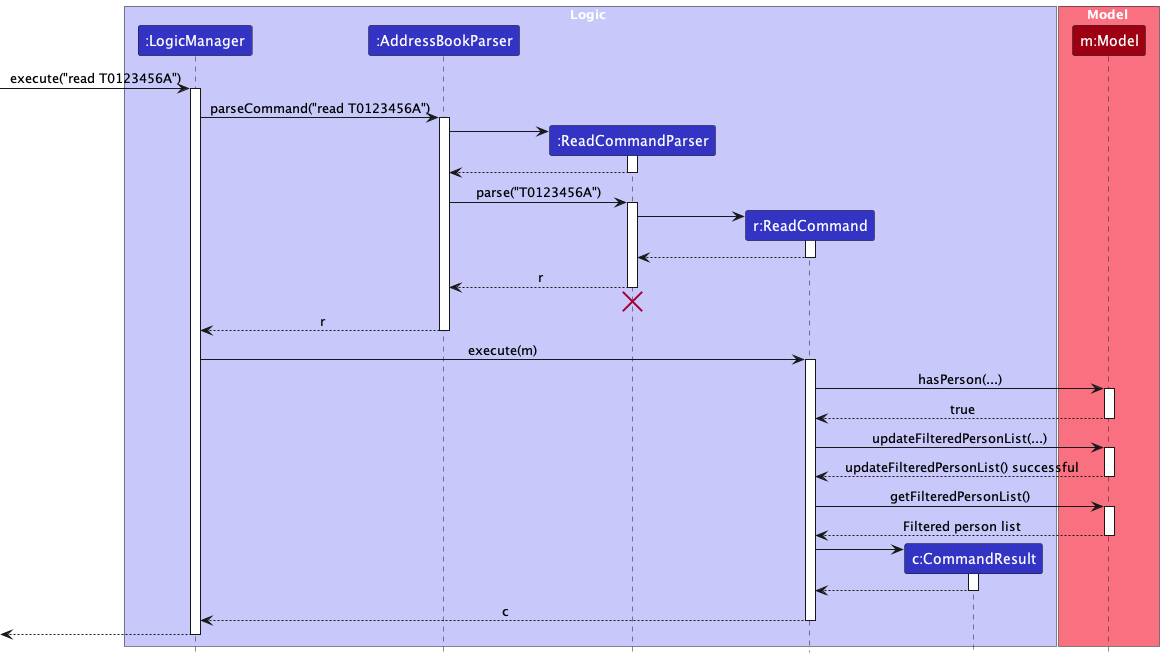
How a read operation goes through the Model component is shown below:
Find patient
Implementation
The find feature lets users find patients with certain values in various fields, namely name, address and condition.
After a command with specific arguments as input, the patient list is filtered and the resultant list is shown.
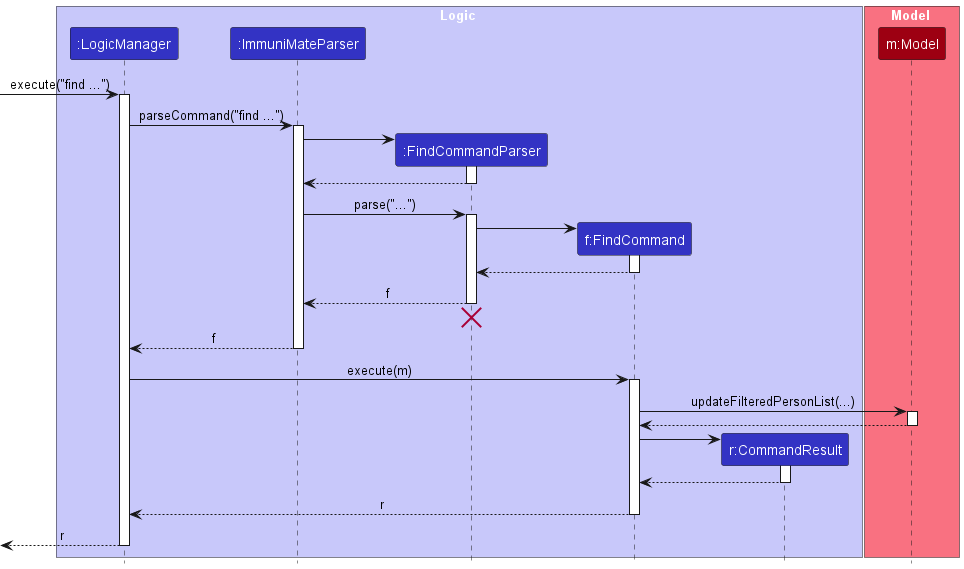
The find command is facilitated by FindCommand and FindCommandParser, extending the Command and Parser classes respectively.
-
FindCommandParser#parseis responsible for parsing the user input and creating a newFindCommandinstance. -
FindCommand#executeis responsible for executing the command, callingModelManager#updateFilteredPersonList(Predicate<Person>)to find patients with the given keywords in the given field.
Step 1. FindCommandParser interprets the user’s input, determine which field the user wishes to find patients by, and creates a new FindCommand instance.
Step 2. The FindCommand#execute is called by the LogicManager.
Step 3. This in turn calls model.updateFilteredPersonList(Predicate<Person>), which identifies patients having any of the keywords in Predicate<Person> in the given field.
Step 4: The FindCommand returns the appropriate CommandResult to indicate the success of the operation.
The following sequence diagram shows how a find operation goes through the Logic and Model components:
Update patient fields
Implementation
Given below is an example usage scenario and how the update mechanism behaves at each step.
Step 1. The user launches the application for the first time.
Step 2. The user types update T0123456A a/35 Bishan Road, #10-40 con/myopia command to update the address and condition fields in the profile of the person with Nric T0123456A in the address book. This calls immuniMateParser.parseCommand(), which separates the user input into the command update and the rest of the arguments.
Step 3. As the command update matches UpdateCommand.COMMAND_WORD, UpdateCommandParser().parse() is called, taking in the rest of the arguments. Here, the arguments are checked if they are null values, then passed into ArgumentTokenizer.tokenize(), where they are separated into Nric and other provided fields by finding their respective prefixes, and stored in an ArgumentMultimap.
Step 4. Still in UpdateCommandParser().parse(), checks are then done to verify the validity of the Nric and that no duplicate prefixes are found. A new UpdatePersonDescriptor object is then created to store the fields present in ArgumentMultimap.
Step 5. At the end of UpdateCommandParser().parse(), a new UpdateCommand instance is created with the Nric and UpdatePersonDescriptor as arguments. UpdateCommand.execute() is then called, taking in the ImmuniMate model as an argument.
Step 6. model.getFilteredPersonsList() retrieves the list of Persons stored, and a check is done to see if ImmuniMate has a Person with the given Nric. This Person is then retrieved from the list, while a new Person object is instantiated, with the Person and UpdatePersonDescriptor as arguments, representing the retrieved Person object with fields updated.
Step 7. model.setPerson() then replaces the retrieved Person object with the new Person object with fields updated, taking in both Person objects as arguments. The model is then saved into storage.
The following sequence diagram shows how an update operation goes through the Logic components:
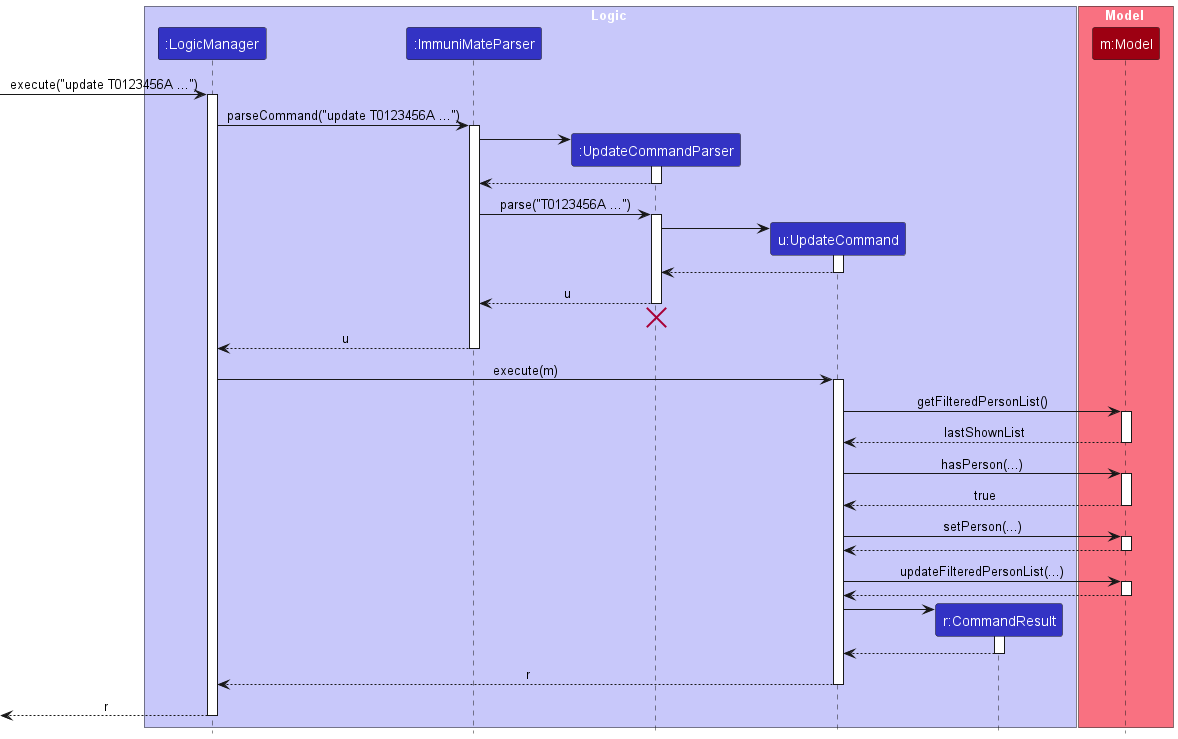
How an update operation goes through the Model component is shown below:
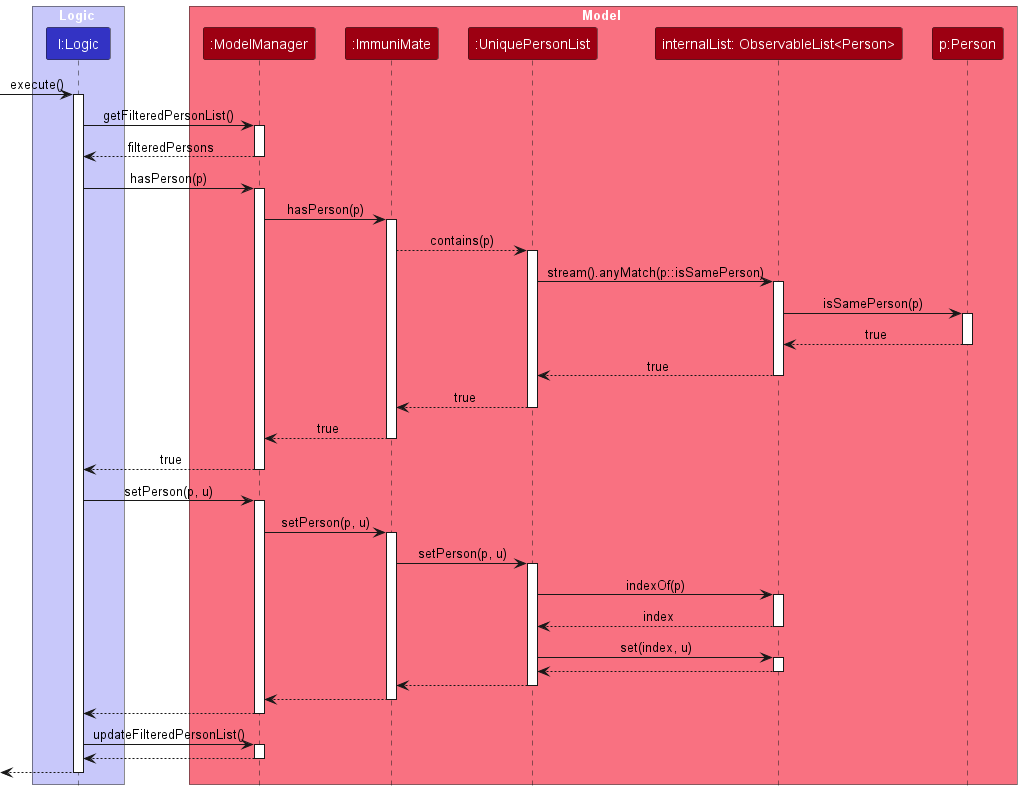
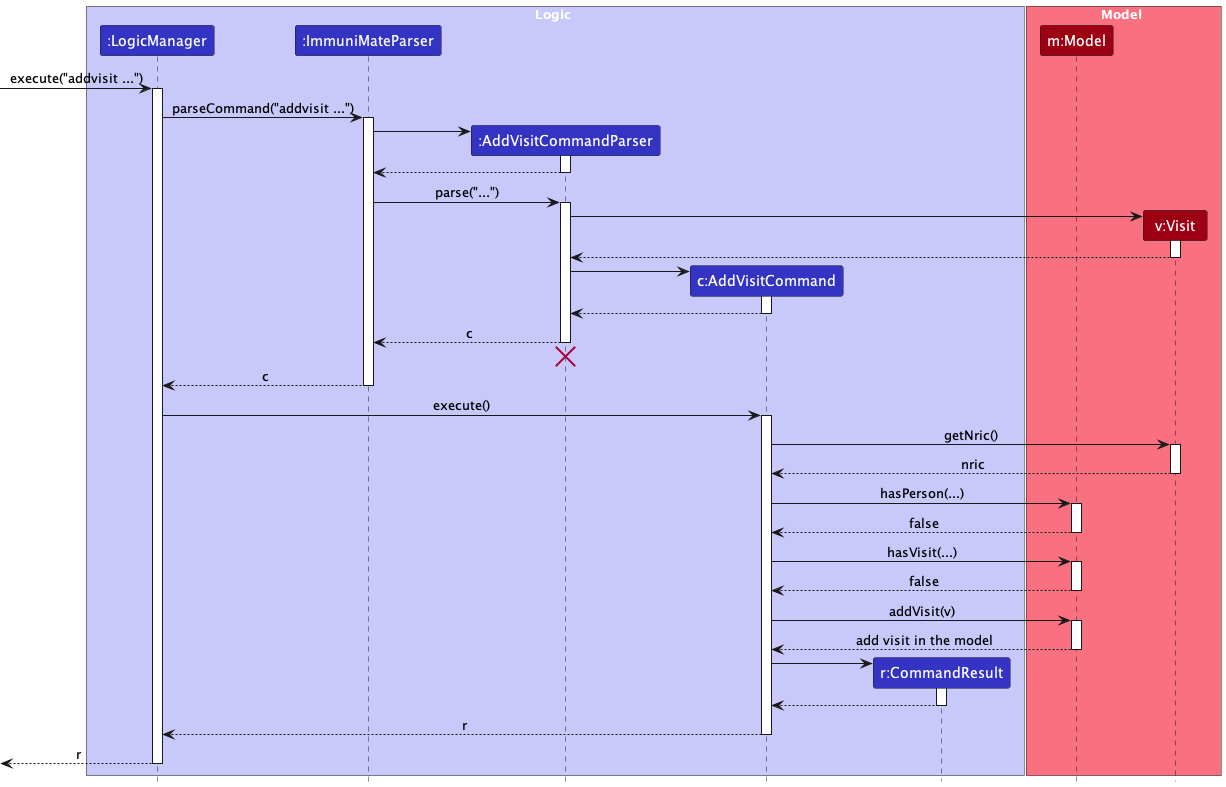
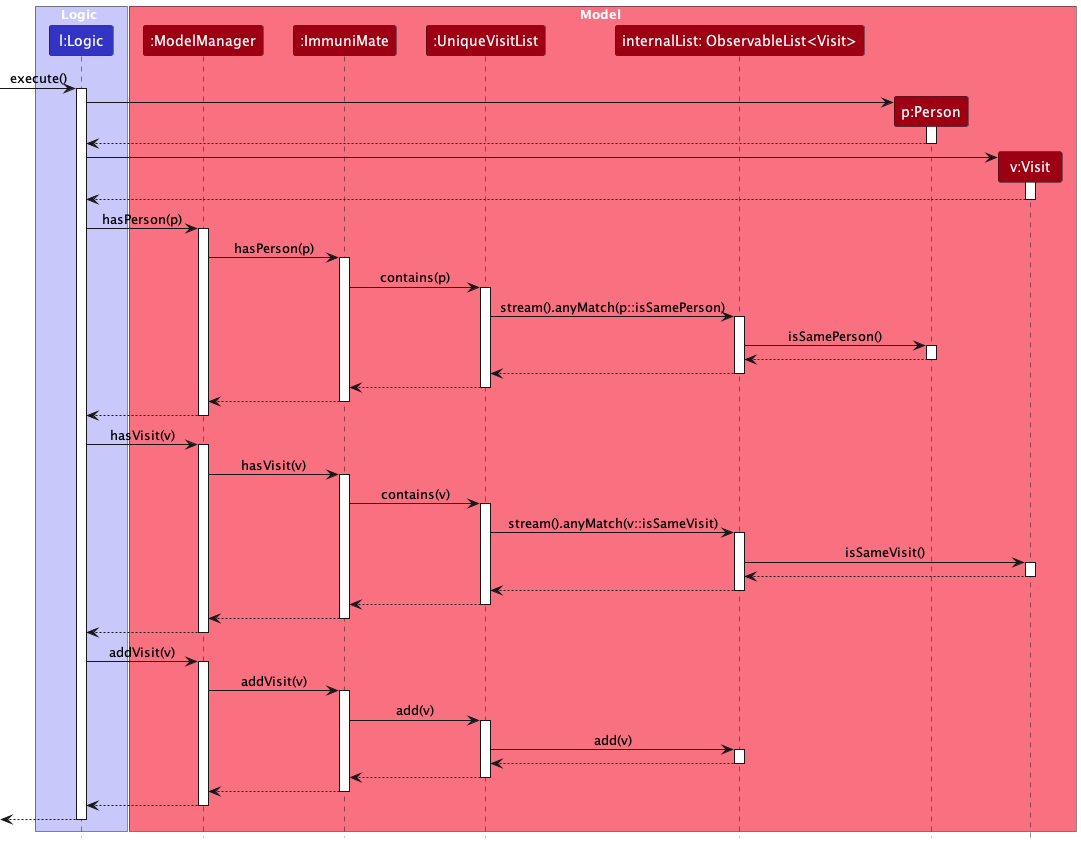
Add patient visit
Implementation
The addvisit feature allows users to add a patient visit by providing input through a command with specific arguments. This visit is then stored within the system for future reference.
The addvisit command is facilitated by AddVisitCommand and AddVisitCommandParser. They extend the Command and Parser classes respectively, storing a new instance of Visit in the UniqueVisitList.
-
AddVisitCommandParser#parseis responsible for parsing the user input and creating a newAddVisitCommandinstance. -
AddVisitCommand#executeis responsible for executing the command and adding the new visit to the system. -
ImmuniMate#addVisit(Visit)is called to add the visit to the internal list of visits. -
UniquePersonList#add(Visit)is used to add the new visit to the system.ModelManager#addVisit(Visit)is called to add the visit to the system. It callsImmuniMate.addVisit(Visit)which callsUniqueVisitList#add(Visit)to add the visit to the internal list of visits. The command checks if the patient exists in the system before adding the new visit of a patient. -
Person#equals(Object)is overridden to check if two patients are the same person. -
UniquePersonList#contains(Person)is used to check if the patient exists in the system’s list of patients. -
ImmuniMate#hasPerson(Person)is used to check if the patient exists in the system.ModelManager#hasPerson(Person)is called to check if the patient exists in the system. It callsImmuniMate.hasPerson(Person)which callsUniquePersonList#contains(Person)to check if the patient exists in the internal list of patients. The command checks for duplicates in the system before adding the new visit. -
Visit#equals(Object)is overridden to check if two visits are duplicates. -
UniquePersonList#contains(Visit)is used to check if the visit already exists in the system’s list of visits. -
ImmuniMate#hasVisit(Visit)is used to check if the visit already exists in the system.ModelManager#hasVisit(Visit)is called to check if the visit already exists in the system. It callsImmuniMate.hasVisit(Visit)which callsUniqueVisitList#contains(Visit)to check if the visit already exists in the internal list of visits.
The creation of Visit instance also rely on field classesNRIC, Symptoms,Diagnosis, Status and DateOfVisit.
Step 1. AddVisitCommandParser interprets the user’s input, creates instances of fields which matches the input, and creates a new AddVisitCommand instance.
Step 2. The AddVisitCommand#execute is called by the LogicManager. The AddVisitCommand checks if the patient already exists in the system by calling model.hasPerson(person).
Step 3. If the patient exists, the AddVisitCommand checks if the visit already exists in the system by calling model.hasVisit(visit).
Step 4. If the visit does not exist, the visit is added to the system by calling model.addVisit(visit).
Step 4: After the visit is added, the AddVisitCommand returns the appropriate CommandResult to indicate the success of the operation.
The following sequence diagram shows how a addvisit operation goes through the Logic component:
 Similarly, the following sequence diagram shows how a addvisit operation goes through the
 Model component:
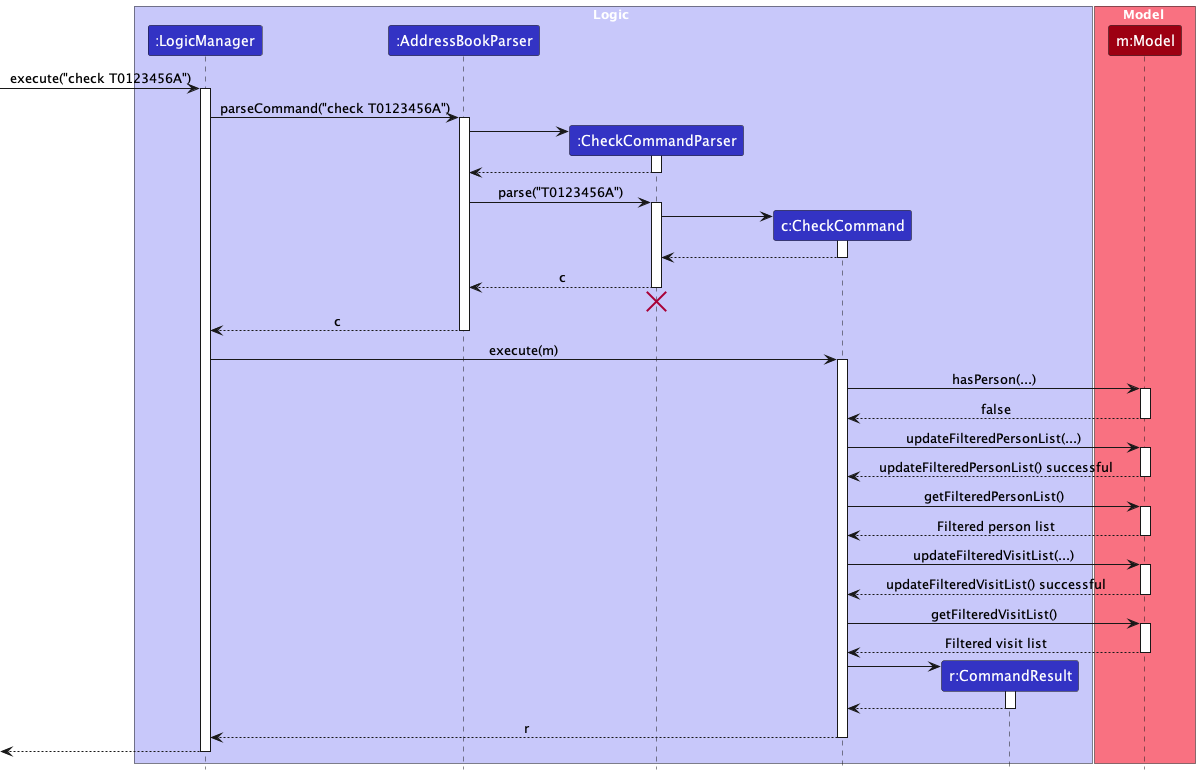
Check a patient’s visit history
Implementation
The check feature allows users to check the visit history of a patient by providing NRIC through a command. This patient visit history is then displayed.
The check command is facilitated by CheckCommand and CheckCommandParser. They extend the Command and Parser classes respectively, displaying patient visit history from list of Visit from the UniqueVisitList.
-
CheckCommandParser#parseis responsible for parsing the user input and creating a newCheckCommandinstance. -
CheckCommand#executeis responsible for executing the command and displaying the patient visit history from the system.CheckCommandchecks if the patient exists in the system before displaying patient visit history. -
ModelManager#hasPerson(Person)is called to check if the patient exists in the system. It callsImmuniMate.hasPerson(Person)which callsUniquePersonList#contains(Person)to check if the patient already exists in the internal list of patients. -
Model#updateFilteredPersonList(Predicate)is called to get the list of patient with specified NRIC in the system. -
Model#updateFilteredVisitList(Predicate)is called to get the list of visits with specified NRIC in the system.
Step 1. CheckCommandParser interprets the user’s input for NRIC, and creates a new CheckCommand instance.
Step 2. The CheckCommand#execute is called by the LogicManager. The CheckCommand checks if the patient exists in the system by calling model.hasPerson(person).
Step 3. If the patient exists, the patient is obtained from the system by calling model.updateFilteredPersonList(pred), followed by calling model.getFilteredPersonList() and Observablelist<Persons>#get(int).
Step 4: Patient visit history is obtained from the system by calling model.updateFilteredVisitList(pred), followed by model.getFilteredVisitList().
Step 5: After the patient visit history is obtained, the CheckCommand formats the patient visit history by calling Messages.formatCheck(visit) and returns the appropriate CommandResult to indicate the success of the operation.
The following sequence diagram shows how a delete operation goes through the Logic component:
 How a check operation goes through the
 Model component is shown below:
Cluster Identification
Implementation
The cluster feature tells users if a certain location has a certain number of patients unwell with an illness.
Provided an integer, location and disease as inputs, it finds unwell patients having an address with the given location as a substring, and diagnosis with the given illness as a substring, and informs the user if the number of those patients is at least that integer.
The cluster command is facilitated by ClusterCommand and ClusterCommandParser, extending the Command and Parser classes respectively, storing a new instance of Person in the UniquePersonList.
-
ClusterCommandParser#parseis responsible for parsing the user input and creating a newClusterCommandinstance. -
ClusterCommand#executeis responsible for executing the command and separating the inputs into their categories (cluster size, address and illness). It callsModelManager#updateFilteredPersonList(Predicate<Person>)to find patients which satisfy the given criteria.
Step 1. ClusterCommandParser interprets the user’s input, and separates it into its constituent categories, and creates a new ClusterCommand instance.
Step 2. The ClusterCommand#execute is called by the LogicManager.
Step 3. This in turn calls model.updateFilteredPersonList(Predicate<Person>), takes the location and illness keywords in Predicate<Person>, and finds all the patients which have them as substrings in their addresses and diagnoses respectively.
Step 4. This also calls model.getFilteredPersonList().size() to obtain the size of the patient group satisfying the given criteria.
Step 5: The ClusterCommand returns the appropriate CommandResult to indicate the success of the operation.
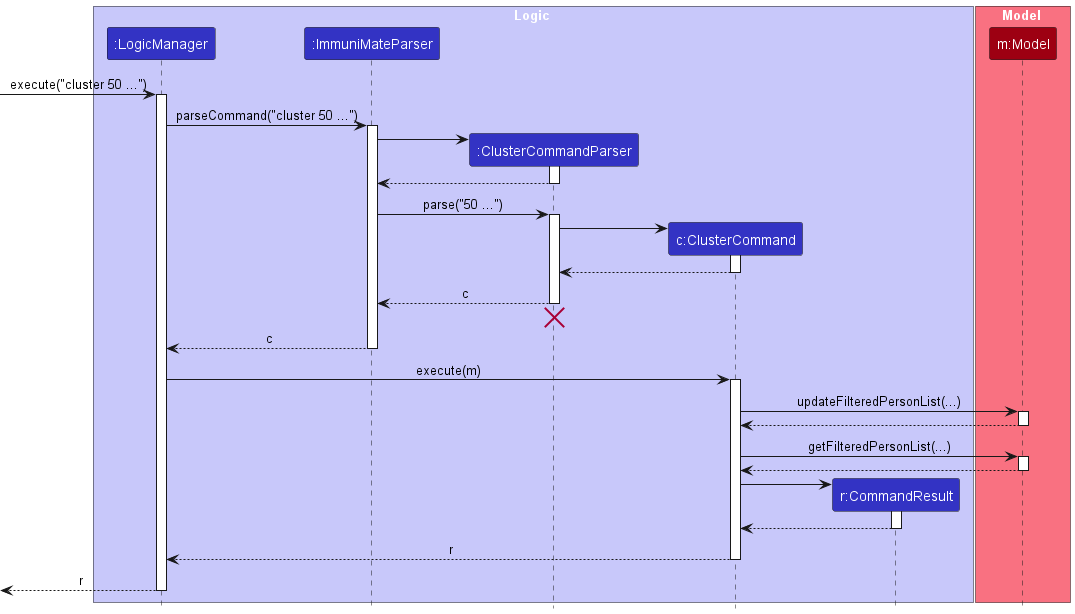
The following sequence diagram shows how a cluster operation goes through the Logic and Model components:
Exit the app
Implementation
Documentation, logging, testing, configuration, dev-ops
Appendix: Requirements
Product scope
Target user profile:
- has a need to manage a significant number of patient information
- prefer desktop apps over other types
- can type fast
- prefers typing to mouse interactions
- is reasonably comfortable using CLI apps
- works at a gp clinic or similar environments
Value proposition: As the number of patients a General Practitioner grows, information management might prove complex, especially so for personal data. ImmuniMate offers a way to record comprehensive information about every patient, while ensuring timely updates and avoiding duplications/contradictions. It also seeks to establish links between patient for contact tracing and finding potential infectious clusters.
User stories
Priorities: High (must have) - * * *, Medium (nice to have) - * *, Low (unlikely to have) - *
| Priority | As a … | I want to … | So that I can… |
|---|---|---|---|
* * * |
New user | see usage instructions | refer to instructions when I forget how to use the App |
* * * |
Healthcare Worker | create a new patient profile | add new patient to database |
* * * |
Healthcare Worker | delete a patient | remove wrong or obselete patient profile from the database |
* * * |
Healthcare Worker | delete patient’s information | remove patient information that is known to be incorrect |
* * * |
Healthcare Worker | read a patient’s information by NRIC | locate details of persons without having to go through the entire list |
* * * |
Healthcare Worker | update a person’s details | keep the details up to date |
* * * |
Healthcare Worker | find a patient by matching criteria | Find a list of patients from with a certain conditio or address |
* * * |
Healthcare Worker | find a patient by name | find a patient in the situation when their NRIC is not immediately available |
* * * |
Healthcare Worker | record visits made by patients | record the change in health condition of the patients across time |
* * |
Healthcare Worker | highlight contradicting information and entries | minimize the mistakes in entries |
* * |
Healthcare Worker | see the history of visits made by a patient | understand the past health condition of a patient |
* * |
Healthcare Worker | be able to tap different contact methods | make sure important information is sent |
* * |
Healthcare Worker | status of health of a patient | give appropriate treatment |
* * |
Healthcare Worker | see clusters of infected patients | understand which areas are at high risk of infection |
* |
Healthcare Worker | find the person who first spread the disease | better understand the disease |
* |
Healthcare Worker | sort persons by name | locate a person easily |
* |
Healthcare Worker | hide private contact details | minimize chance of someone else seeing them by accident |
* |
Healthcare Worker | be able to resolve duplicate information | correct wrong inputs |
* |
Healthcare Worker | see the close contacts of a patient | see the links between infected patients |
Use cases
(For all use cases below, the IMS is the ImmuniMate system and the Healthcare Worker is the user, unless specified otherwise)
Use Case: UC01 - Create Patient Profile
- Actor: Healthcare Worker
- Description: Healthcare worker creates a new patient profile in the IMS.
- Preconditions: Healthcare worker has launched the system.
- Guarantees: New patient profile is successfully created in the IMS.
-
MSS:
- Healthcare worker choose to create a new patient profile.
- IMS requests the necessary details for the new patient profile (name, NRIC, date of birth, sex, phone number, address, email, country of nationality, date of admission, blood type, allergies).
- Healthcare worker enters the patient’s details.
- IMS validates the entered data.
- IMS adds the new patient profile to the database.
-
Extensions:
3a. IMS detects a conflict in the entered data (user existing).
3a1. IMS shows the conflicting existing entry 3a2. IMS requests for the correct data. 3a3. Healthcare Worker enters new data. Steps 3a1-3a3 are repeated until the data entered are correct, or the user cancels the action. Use case resumes from step 4.
3b. IMS detects an error in the entered data.
3b1. IMS requests for the correct data. 3b2. Healthcare Worker enters new data. Steps 3b1-3b2 are repeated until the data entered are correct. Use case resumes from step 4.
*a. At any time, Healthcare Worker chooses to cancel creating the patient profile.
*a1. IMS requests confirmation to cancel. *a2. Healthcare Worker confirms the cancellation. Use case ends.
Use Case: UC02 - Read Patient Profile
- Actor: Healthcare Worker
- Description: Healthcare worker reads patient profile in the IMS.
- Preconditions: Healthcare worker has launched the system.
- Guarantees: Existing patient profile in the IMS is successfully displayed.
-
MSS:
- Healthcare worker choose to read a patient profile.
- IMS requests the necessary detail for reading patient profile (NRIC).
- Healthcare worker enters the patient’s details.
- IMS validates the entered data.
- IMS displays the patient profile to the database.
-
Extensions:
3a. IMS detects an error in the entered data (user does not exist).
3a1. IMS shows the conflicting existing entry 3a2. IMS requests for the correct data. 3a3. Healthcare Worker enters new data. Steps 3a1-3a3 are repeated until the data entered are correct, or the user cancels the action. Use case resumes from step 4.
3b. IMS detects an error in the entered data (wrong NRIC format).
3b1. IMS requests for the correct data. 3b2. Healthcare Worker enters new data. Steps 3b1-3b2 are repeated until the data entered are correct. Use case resumes from step 4.
*a. At any time, Healthcare Worker chooses to cancel creating the patient profile.
*a1. IMS requests confirmation to cancel. *a2. Healthcare Worker confirms the cancellation. Use case ends.
Use Case: UC03 - Find Patient Information
- Actor: Healthcare Worker
- Description: Healthcare worker searches for specific patient information in the IMS.
- Preconditions: Healthcare worker has launched the system.
- Guarantees: Relevant patient information is displayed for the healthcare worker to view.
-
Basic Flow:
- Healthcare worker chooses to find patient information meeting specified criteria.
- IMS searches for and displays the relevant patients.
-
Extensions: 2a. IMS detects an error in the entered data.
- 2a1. IMS requests for the correct data.
- 2a2. Healthcare Worker enters new data.
- Steps 2a1-2a2 are repeated until the data entered are correct. Use case resumes from step 3.
Use Case: UC04 - Update Patient Information
- Actor: Healthcare Worker
- Description: Healthcare worker updates a patient’s information in the IMS.
- Preconditions: Healthcare worker has launched the system and has selected the patient whose information needs to be updated.
- Guarantees: Patient’s information is successfully updated in the IMS.
-
Basic Flow:
- Healthcare worker chooses to update a certain patient’s certain information.
- IMS validates the new content.
- IMS updates the patient’s information in the database.
-
Extensions:
2a. IMS detects an error in the entered data.
2a1. IMS requests for the correct data. 2a2. Healthcare Worker enters new data. Steps 2a1-2a2 are repeated until the data entered are correct. Use case resumes from step 3.
Use Case: UC05 - Delete Patient Profile
- Actor: Healthcare worker
- Description: Healthcare worker deletes a patient’s record from the IMS.
- Preconditions: Healthcare worker has opened the app and has selected the patient whose record needs to be deleted.
- Guarantees: Patient’s record is successfully deleted from the IMS.
-
MSS:
- Healthcare worker choose to delete a specified patient’s record.
- IMS validates the NRIC and deletes the patient’s record from the database.
-
Extensions:
2a. IMS cannot find the patient specified.
- 2a1. IMS requests for the correct NRIC.
- 2a2. Healthcare worker enters new NRIC.
- Steps 2a1-2a2 are repeated until the data entered are correct or Healthcare worker cancels the action. Use case resumes from step 3.
Use Case: UC06 - Delete Patient Information
- Actor: Healthcare Worker
- Description: Healthcare worker deletes specific information from a patient’s record in the IMS.
- Preconditions: Healthcare worker has launched the system and has selected the patient whose information needs to be deleted.
- Guarantees: Specified information is successfully deleted from the patient’s record in the IMS.
-
MSS:
- Healthcare worker chooses to delete certain fields of a certain patient’s profile.
- IMS validates the information to be deleted and deletes the specified information from the patient’s record in the database.
-
Extensions:
2a. IMS cannot find the patient specified.
- 2a1. IMS requests for the correct NRIC.
- 2a2. Healthcare worker enters new NRIC.
- Steps 2a1-2a2 are repeated until the data entered are correct or Healthcare worker cancels the action. Use case resumes from step 3.
2b. IMS cannot find the specified information.
- 2b1. IMS alerts healthcare worker that the specified information is not found.
- 2b2. Healthcare worker enters new field.
- Steps 2b1-2b2 are repeated until the data entered are correct or Healthcare worker cancels the action. Use case resumes from step 3.
2c. Healthcare worker chooses to delete a mandatory field.
- 2c1. IMS alerts healthcare worker that mandatory field cannot be deleted.
- 2c2. Healthcare worker enters new field.
- Steps 2c1-2c2 are repeated until the data entered are correct or Healthcare worker cancels the action. Use case resumes from step 3.
Use Case: UC07 - Add Patient Visit
- Actor: Healthcare Worker
- Description: Healthcare worker adds a visit record for a patient in the IMS.
- Preconditions: Healthcare worker has launched the system.
- Guarantees: A new visit record is successfully added for the patient in the IMS.
-
Main Success Scenario (MSS):
- Healthcare worker chooses to add a new patient visit.
- IMS requests the necessary details for the visit (NRIC, date of visit, diagnosis, symptoms, status).
- Healthcare worker enters the required information for the visit.
- IMS validates the entered data.
- IMS adds the visit record to the patient’s profile in the database.
- IMS confirms that the visit has been added successfully.
- Use case ends.
-
Extensions:
3a. IMS detects an error in the entered data (patient does not exist).
- 3a1. IMS notifies Healthcare Worker that the patient does not exist.
- 3a2. Healthcare Worker opts to create a new patient profile or re-enters correct data.
- Steps 3a1-3a2 are repeated until valid data are entered, or the user cancels the action.
- Use case resumes from step 4 if valid data are entered.
3b. IMS detects an error in the entered data (e.g., incorrect NRIC format, invalid date of visit).
- 3b1. IMS requests for the correct data.
- 3b2. Healthcare Worker enters new data.
- Steps 3b1-3b2 are repeated until the data entered are correct.
- Use case resumes from step 4.
3c. IMS detects missing mandatory fields (e.g., NRIC, date of visit).
- 3c1. IMS displays an error message indicating which fields are missing.
- 3c2. Healthcare Worker provides the missing information.
- Steps 3c1-3c2 are repeated until all required data are provided.
- Use case resumes from step 4.
*a. At any time, Healthcare Worker chooses to cancel the addition of the patient visit.
- *a1. IMS requests confirmation to cancel.
- *a2. Healthcare Worker confirms the cancellation.
- Use case ends.
Use Case: UC08 - Check Patient Visit History
- Actor: Healthcare Worker
- Description: Healthcare worker checks patient visit history in the IMS.
- Preconditions: Healthcare worker has launched the system.
- Guarantees: Existing patient visit history in the IMS is successfully displayed.
-
MSS:
- Healthcare worker choose to check a patient visit history.
- IMS requests the necessary detail for checking patient visit history (NRIC).
- Healthcare worker enters the patient’s details.
- IMS validates the entered data.
- IMS displays the patient profile to the database.
-
Extensions:
3a. IMS detects an error in the entered data (user does not exist).
3a1. IMS shows the conflicting existing entry 3a2. IMS requests for the correct data. 3a3. Healthcare Worker enters new data. Steps 3a1-3a3 are repeated until the data entered are correct, or the user cancels the action. Use case resumes from step 4.
3b. IMS detects an error in the entered data (wrong NRIC format).
3b1. IMS requests for the correct data. 3b2. Healthcare Worker enters new data. Steps 3b1-3b2 are repeated until the data entered are correct. Use case resumes from step 4.
*a. At any time, Healthcare Worker chooses to cancel creating the patient profile.
*a1. IMS requests confirmation to cancel. *a2. Healthcare Worker confirms the cancellation. Use case ends.
Use Case: UC09 - Finding Clusters
- Actor: Healthcare Worker
- Description: Healthcare worker tries to identify disease clusters through data in the ImmuniMate System.
- Preconditions: Healthcare worker has logged into the system.
- Guarantees: There is at least 1 patient profile saved in IMS.
-
MSS:
- Healthcare worker wants to find disease clusters/potential disease clusters.
- IMS requests Healthcare Worker for relevant details.
- Healthcare worker enters integer, location and illness.
- IMS validates the entered data and displays all patients at that location unwell with the illness.
-
Extensions:
3a. IMS detects an error in the entered data (invalid cluster size).
- 3a1. IMS shows the conflicting existing entry
- 3a2. IMS requests for the correct data.
- 3a3. Healthcare Worker enters data with valid cluster size.
Steps 3a1-3a3 are repeated until the data entered are correct, or the user cancels the action. Use case resumes from step 4.
3b. IMS detects an error in the entered data (empty location).
- 3b1. IMS requests for the correct data.
- 3b2. Healthcare Worker enters data with valid location.
Steps 3b1-3b2 are repeated until the data entered are correct. Use case resumes from step 4.
Use Case: UC10 - List all patients
- Actor: Healthcare Worker
- Description: Healthcare worker lists all patients in the IMS.
- Preconditions: Healthcare worker has launched the system. The data file is not corrupted.
- Guarantees: Existing patients in the IMS are successfully displayed.
-
MSS:
- Healthcare worker choose to list all patients.
- IMS displays all patients in the database.
Use Case: UC11 - Access help
- Actor: Healthcare Worker
- Description: Healthcare worker accesses the help guide in the IMS.
- Preconditions: Healthcare worker has launched the system.
- Guarantees: The help guide is successfully displayed.
-
MSS:
- Healthcare worker chooses to access the help guide.
- IMS displays the help guide.
Non-Functional Requirements
- Should work on any mainstream OS as long as it has Java
11or above installed. - Should be able to hold up to 10000 persons without a noticeable sluggishness in performance for typical usage.
- Should have high data persistency.
- Should work on both 32-bit and 64-bit environments.
- Should be easily downloaded from websites/app stores, and need no prior setup besides downloading Java 11.
- Should not exceed 100MB in storage space.
- Data collection on the app should adhere to the Personal Data Protection Act (PDPA).
- Unimplemented fields should be added easily.
- Should be convenient to expand storage capacity of the app when needed.
- Should use automated testing.
- Should respond to queries within 1 second.
- Project should adhere to a schedule to deliver new features fortnightly.
- Project should aim to solve bugs found in one version by the next version.
- Should be usable by doctors/nurses/receptionists with limited guidance.
- Should be faster to use by typing queries than using the mouse.
Glossary
- Name: The name of the patient. Case-sensitive alphabetical characters with spaces, capped at 2,000,000,000 characters.
- NRIC: National Registration Identity Card number, follows Singapore NRIC format. 9 characters. First character can be any of S, T, followed by 7 digits, and the last character is an alphabet. NRIC is case-insensitive.
-
Date of Birth (DOB): The patient’s date of birth, in the format
yyyy-MM-dd. -
Sex: The biological sex of the patient, limited to
MorF. - Phone Number: The contact number of the patient, limited to 8 digits.
- Address: The home address of the patient. Any text except blank and empty text is accepted.
-
Email: The email address of the patient, follows a valid format:
<a-zA-Z0-9>@<a-zA-Z0-9>.com. Case-sensitive. - Country of Nationality: The country name of the patient’s nationality. Any text except blank and empty text is accepted.
-
Date of Admission (DOA): The date when the patient was admitted for the first visit, in the format
yyyy-MM-dd. -
Blood Type: The blood type of the patient. accepts any of
A+,A-,B+,B-,AB+,AB-,O+,O-. - Allergies: Any allergies the patient may have. Any text except blank and empty text is accepted.
- Conditions: Any prior medical conditions of the patient. Any text except blank and empty text is accepted.
- Symptoms: The latest symptoms experienced by the patient. Any text except blank and empty text is accepted.
- Diagnosis: The latest diagnosis of the patient’s condition. Any text except blank and empty text is accepted.
-
Status: The current health status of the patient, can be
HEALTHY(green),PENDING(yellow), orUNHEALTHY(red).PENDINGmeans the patient still need upcoming diagnosis to determine the current health status. -
Date of Visit: The date of the patient’s current visit, in the format
yyyy-MM-dd. - Fields: The fields of the patient’s information, such as name, status, contact.
- Cluster: A group of patients who are infected by the same disease.
- Patient Visit: A record of a patient’s one specific visit to the clinic, including the date of visit, symptoms, diagnosis, and status.
- Patient History: A collection of all the visits by a patient.
-
Patient Profile: A collection of all the information about a patient, including the patient’s name,
Nric,Phone,Address,Email,Country.
Appendix: Instructions for manual testing
Given below are instructions to test the app manually.
Launch and shutdown
-
Initial launch
1.1 Download the jar file and copy into an empty folder.
1.2 Run
java -jar immuniMate.jarfor the jar file Expected: Shows the GUI with a set of sample contacts. -
Saving window preferences
2.1 Move the window to a different location. Close the window.
2.2 Re-launch the app by running
java -jar ImmuniMate.jaragain.
Expected: The most recent window size and location is retained.
Adding a person
- Adding a person while all persons are being shown.
- Prerequisites:
- List all persons using the
listcommand. Multiple persons in the list. - The person with NRIC
S1234567Ais not already created in the system. - The person with NRIC
T0234567Cis already created in the system.
- List all persons using the
- Test case:
create n/Alice Tan ic/S1234567A dob/1990-01-01 hp/12345678 a/123, Jurong West Ave 6, #08-111 s/F st/PENDING
Expected: A new person is added to the list. The result panel shows the details of the new person. - Test case:
create n/Bob Tan ic/T0234567C dob/1990-01-01 hp/12345678 a/123, Jurong West Ave 6, #08-111 s/M st/PENDING
Expected: A new person is not added to the list. The result panel shows an error message, indicating that the person already exists in the system. - Test case:
create n/Charlie Tan ic/S1234567A
Expected: A new person is not added to the list. The result panel shows an error message, indicating that the command format is invalid.
- Prerequisites:
- Adding a person while only some persons are being shown
- Prerequisites:
- Show only 1 person’s details using the
find n/alexcommand. One person is shown in the list.
- Show only 1 person’s details using the
- Test case:
create n/Bob Tan ic/T0234567C dob/1990-01-01 hp/12345678 a/123, Jurong West Ave 6, #08-111 s/M st/PENDING
Expected: A new person is not added to the list. The result panel shows an error message, indicating that the person already exists in the system.
- Prerequisites:
Reading a person
- Reading a person while all persons are being shown.
- Prerequisites:
- List all persons using the
listcommand. Multiple persons in the list. - The person with NRIC
S1234567Ais already created in the system with acreatecommand.
- List all persons using the
-
Test case:
read S1234567A
Expected: Details of the read patient shown in result panel. The list panel shows the read person. -
Test case:
read S9876543N
Expected: No person is read. Error details shown. - Other incorrect read commands to try:
read,read 0,...(where the input for NRIC field does not follow format for NRIC)
Expected: Similar to previous.
- Prerequisites:
- Reading a person while only some persons are being shown
- Prerequisites:
- Show only 1 person’s details using the
find n/alexcommand. One person is shown in the list. - The person with NRIC
S1234567Ais already created in the system with acreatecommand.
- Show only 1 person’s details using the
- Test case:
read S1234567A
Expected: The result panel shows the details of the read person. The list panel shows the read person.
- Prerequisites:
Deleting a person
-
Deleting a person while all persons are being shown
- Prerequisites:
- List all persons using the
listcommand. Multiple persons in the list. - The person with NRIC
S1234567Ais already created in the system with acreatecommand.
- List all persons using the
-
Test case:
delete S9234568N
Expected: First patient is deleted from the list. Details of the deleted patient shown in the status message. Timestamp in the status bar is updated. -
Test case:
delete S9876543N
Expected: No person is deleted. Error details shown in the status message. Status bar remains the same. - Other incorrect delete commands to try:
delete,delete 0,...(where the input for NRIC field does not follow format for NRIC)
Expected: Similar to previous.
- Prerequisites:
-
Deleting a person while only some persons are being shown
- Prerequisites:
- Show only 1 person’s details using the
find n/alexcommand. One person is shown in the list. - The person with NRIC
S1234567Ais already created in the system with acreatecommand.
- Show only 1 person’s details using the
- Test case:
delete S1234567A
Expected: The person is deleted from the list. The result panel shows the details of the deleted person. The list panel shows a full list of patients.
- Prerequisites:
Updating a person
- Updating a existing person’s updatable fields
- Prerequisites:
- The person with NRIC
S1234567Ais already created in the system with acreatecommand.
- The person with NRIC
- Test case:
update S1234567A a/35 Bishan Road, #10-40 con/myopia
Expected: The person’s address is updated to35 Bishan Road, #10-40and condition is updated tomyopia. The result panel shows the updated person’s details. - Test case:
update S1234567A a/35 Bishan Road, #10-40 con/
Expected: The person’s both fields are not updated. The result panel shows an error message, indicating that the argument for condition is invalid. - Test case:
update S1234567A
Expected: The person is not updated at all. The result panel shows an error message, indicating that the command format is invalid.
- Prerequisites:
- Updating a non-existing person
- Prerequisites:
- The person with NRIC
S1234568Adoes not exist in the system.
- The person with NRIC
- Test case:
update S1234568A a/35 Bishan Road, #10-40 con/myopia
Expected: The person is not updated at all. The result panel shows an error message, indicating that the person does not exist in the system.
- Prerequisites:
- Updating a person’s non-updatable fields
- Prerequisites:
- The person with NRIC
S1234567Ais already created in the system with acreatecommand.
- The person with NRIC
- Test case:
update S1234567A a/35 Bishan Road, #10-40 con/myopia ic/S1234568A
Expected: The person’s address is updated to35 Bishan Road, #10-40and condition is updated tomyopia. The NRIC is not updated.
- Prerequisites:
Finding a person
- Finding a person by name, condition or address
- Prerequisites:
- The person with name
Alex Yeohexists in the system. - The person with condition
diabetesexists in the system. - The person with address
123, Jurong West Ave 6, #08-111exists in the system.
- The person with name
- Test case:
find n/Alex Yeoh
Expected: The person with nameAlex Yeohis shown in the list. The result panel shows the details of the person. - Test case:
find con/diabetes
Expected: The person with conditiondiabetesis shown in the list. The result panel shows the details of the person. - Test case:
find a/123, Jurong West Ave 6, #08-111
Expected: The person with address123, Jurong West Ave 6, #08-111is shown in the list. The result panel shows the details of the person.
- Prerequisites:
- Finding a person by NRIC
- Test case:
find n/S1234567A
Expected: The person with NRICS1234567Ais not shown in the list. The result panel shows an error message, indicating that the command format is invalid.
- Test case:
Deleting a person’s information
- Deleting a person’s optional fields
- Prerequisites:
- The person with NRIC
S1234567Aexists in the system. - The person with NRIC
S1234568Adoes not exist in the system.
- The person with NRIC
- Test case:
deleteinfo S1234567A a/
Expected: The person’s address becomes null. The result panel shows the updated person’s details. - Test case:
deleteinfo S1234567A a/ con/
Expected: The person’s address and condition become null. The result panel shows the updated person’s details. - Test case:
deleteinfo S1234567A
Expected: The person’s information is not deleted. The result panel shows an error message, indicating that the command format is invalid. - Test case:
deleteinfo S1234568A e/
Expected: The person’s name is not deleted. The result panel shows an error message, indicating that the person does not exist in the system.
- Prerequisites:
- Deleting a person’s mandatory fields
- Prerequisites:
- The person with NRIC
S1234567Aexists in the system.
- The person with NRIC
- Test case:
deleteinfo S1234567A n/
Expected: The person’s name is not deleted. The result panel shows an error message, indicating that the name field cannot be deleted.
- Prerequisites:
Adding a person’s visit
- Adding a person’s visit while all persons are being shown
- Prerequisites:
- List all persons using the
listcommand. Multiple persons in the list. - The person with NRIC
S1234567Ais already created in the system with acreatecommand. - The person with NRIC
S9876543Ndoes not exist in the system. - The visit with date
2021-09-01and with NRICS1234567Ais already created in the system. - The visit with date
2021-09-03and with NRICS9876543Ndoes not exist in the system.
- List all persons using the
- Test case:
addvisit S1234567A d/2021-09-03 dia/fever sym/cough st/PENDING
Expected: The person’s visit is added to the system. The result panel shows the details of the added visit. - Test case:
addvisit S9876543N d/2021-09-03 dia/fever sym/cough st/PENDING
Expected: The person’s visit is not added. The result panel shows an error message, indicating that the person does not exist in the system. - Test case:
addvisit S1234567A d/2021-09-01 dia/fever sym/cough st/PENDING
Expected: The person’s visit is not added. The result panel shows an error message, indicating that the visit already exists in the system. - Other incorrect addvisit commands to try:
addvisit,addvisit 0,...(where the input for NRIC field does not follow format for NRIC)
Expected: Similar to previous. The result panel shows an error message, indicating that the command format is invalid.
- Prerequisites:
Checking a person’s visit history
- Checking a person while all persons are being shown.
- Prerequisites:
- List all persons using the
listcommand. Multiple persons in the list. - The person with NRIC
S1234567Ais already created in the system with acreatecommand.
- List all persons using the
-
Test case:
check S1234567A
Expected: Details of the checked person’s visit history is shown in the result panel. The list panel shows the checked person. -
Test case:
check S9876543N
Expected: No person is checked. Error details shown. - Other incorrect read commands to try:
check,check 0,...(where the input for NRIC field does not follow format for NRIC)
Expected: Similar to previous. 2.
- Prerequisites:
- Checking a person while only some persons are being shown
- Prerequisites:
- Show only 1 person’s details using the
find n/alexcommand. One person is shown in the list. - The person with NRIC
S1234567Ais already created in the system with acreatecommand.
- Show only 1 person’s details using the
- Test case:
check S1234567A
Expected: The result panel shows the details of the checked person’s visit history. The list panel shows the checked person.
- Prerequisites:
Planned enhancements
Include FIN as accepted values for field NRIC: The field NRIC should accept F, M and G as valid values, as they are valid first characters for foreigners’ FIN (foreign identification number).
Allow Name to take special characters: The field Name should be able to accommodate names with special characters such as dashes, slashes, apostrophes etc.
Limit Country to a list of valid countries: The field Country should be limited to a list of countries, to prevent invalid entries.
Make Email case-insensitive: The field Email should be case-insensitive, as emails are not case-sensitive in practice.